So It is a post for beginners who want to just look inside the recovery.img and do some modification like changing the default background image to a custom image. So without wasting any time here We Go....
Requirements :
Quote:
Recovery.img (Most Important) :p
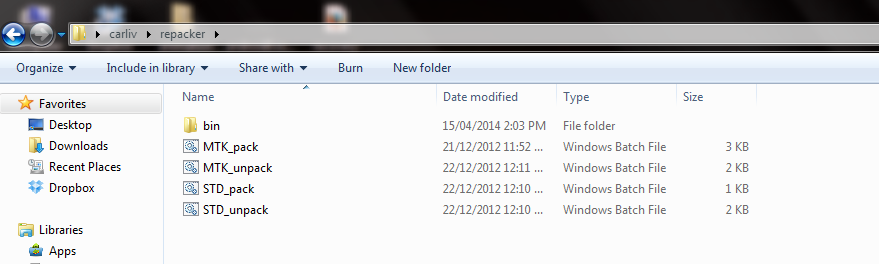
Boot/Recovery repack utils for WINDOWS by @michfood
Any Image editor Like Photoshop Or GIMP .
Procedure :
Quote:
Just place the recovery.img in the same folder where You extracted The boot/recovery repack tool.
Drag and drop recovery.img on MTK_Unpack and it will split the recovery into its parts.
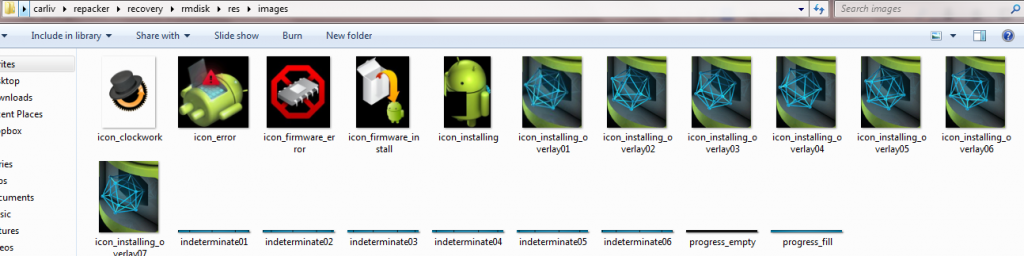
Now browser into recovery > rmdisk > res > images open the images edit them or replace them with your desirable .png's.
Now again drag the recovery folder and drop on MTK_pack after Modification.
Voila .!!!!!!!!
You are Done with changing the background of your custom recovery. */ Just Flash This Recovery In FastBoot. :D
PLEASE PRESS THANKS INSTEAD OF TYPING :fingers-crossed: THANK YOU FOR UNDERSTANDING :o
A cross compiler is a compiler capable of creating executable code for a platform other than the one on which the compiler is running. Cross compiler tools are used to generate executables for embedded system or multiple platforms. It is used to compile for a platform upon which it is not feasible to do the compiling, like microcontrollers that don't support an operating system. From wikipedia
How is that connected with an Android?
In order to create a native C/C++ binary for an Android, you must firstly compile the source code. Usually you can't do so on an Android itself due to lack of proper tools and environment, or hardware barriers, especially amount of RAM. This is why you should learn how to cross-compile, to create a binary on your PC, that your ARM-based Android will understand.
Why do I need it?
You need to learn cross-compiling technique if you want to run native C/C++ programs on an Android. Actually, if you've already built your own custom ROM from AOSP sources (i.e. CyanogenMod), then you used cross-compiling tools and methods even without noticing :).
Building an AOSP ROM is fairly easy, there's one command like brunch, which does the job. However, what if you want to compile a custom, not natively included binary? This is the purpose of this tutorial.
What I will learn from this guide?
How to properly set C/C++ building environment
How to build a native C/C++ application for Android device
How to optimize native binaries for my device
Step 1 - The Beginning
You should start from installing any Linux-based OS, I highly suggest trying a Debian-based distro (such as Ubuntu), or even Debian itself, as this tutorial is based on it :).
In general, I highly suggest to compile an AOSP ROM (such as CyanogenMod) for your device firstly. This will help you to get familiar with cross-compiling on Android. I also suggest to compile one or two programs from source for your Linux, but if you're brave enough to learn cross-compiling without doing any of these, you can skip those suggestions :).
Step 2 - Setting up
Firstly you should make sure that you have all required compile tools already.
This should do the trick and install all required components.
I suggest creating a new folder and navigating to it, just to avoid a mess, but you can organize everything as you wish.
Now you should make a standalone toolchain, navigate to root of your ndk (this is important) and then build your toolchain:
Quote:
root@ArchiDroid:~# cd ndk/
root@ArchiDroid:~/ndk# build/tools/make-standalone-toolchain.sh --toolchain=arm-linux-androideabi-4.8 --platform=android-18 --install-dir=/root/ndkTC
Copying prebuilt binaries...
Copying sysroot headers and libraries...
Copying libstdc++ headers and libraries...
Copying files to: /root/ndkTC
Cleaning up...
Done.
You should edit bolded variables to your preferences. Toolchain is the version of GCC you want to use, 4.8 is currently the newest one, in the future it may be 4.9 and so on. Platform is a target API for your programs, this is important only for android-specific commands, such as logging to logcat. When compiling a native Linux program, this won't matter (but it's a good idea to set it properly, just in case). Install dir specifies destination of your toolchain, make sure that it's other than ndk (as you can see I have ndk in /root/ndk and toolchain in /root/ndkTC).
Now you need to download my exclusive cc.sh script from here and make it executable.
This script is a very handy tool written by me to make your life easier while cross-compiling. Before running it make sure to edit "BASIC" options, especially NDK paths. Apart from that it's a good idea to take a look at DEVICEFLAGS and setting them properly for your device, or clearing for generic build. You don't need to touch other ones unless you want/need them.
Just for a reference, I'll include currently editable options:
Quote:
#############
### BASIC ###
#############
# Root of NDK, the one which contains $NDK/ndk-build binary
NDK="/root/ndk"
# Root of NDK toolchain, the one used in --install-dir from $NDK/build/tools/make-standalone-toolchain.sh. Make sure it contains $NDKTC/bin directory with $CROSS_COMPILE binaries
NDKTC="/root/ndkTC"
# Optional, may help NDK in some cases, should be equal to GCC version of the toolchain specified above
export NDK_TOOLCHAIN_VERSION=4.8
# This flag turns on ADVANCED section below, you should use "0" if you want easy compiling for generic targets, or "1" if you want to get best optimized results for specific targets
# In general it's strongly suggested to leave it turned on, but if you're using makefiles, which already specify optimization level and everything else, then of course you may want to turn it off
ADVANCED="1"
# Device CFLAGS, these should be taken from TARGET_GLOBAL_CFLAGS property of BoardCommonConfig.mk of your device, eventually leave them empty for generic non-device-optimized build
# Please notice that -march flag comes from TARGET_ARCH_VARIANT
DEVICECFLAGS="-march=armv7-a -mtune=cortex-a9 -mfpu=neon -mfloat-abi=softfp"
# This specifies optimization level used during compilation. Usually it's a good idea to keep it on "-O2" for best results, but you may want to experiment with "-Os", "-O3" or "-Ofast"
OLEVEL="-O2"
# This specifies extra optimization flags, which are not selected by any of optimization levels chosen above
# Please notice that they're pretty EXPERIMENTAL, and if you get any compilation errors, the first step is experimenting with them or disabling them completely, you may also want to try different O level
OPTICFLAGS="-s -flto=8 -ffunction-sections -fdata-sections -fvisibility=hidden -funswitch-loops -frename-registers -frerun-cse-after-loop -fomit-frame-pointer -fgcse-after-reload -fgcse-sm -fgcse-las -fweb -ftracer -fstrict-aliasing"
# This specifies extra linker optimizations. Same as above, in case of problems this is second step for finding out the culprit
LDFLAGS="-Wl,-O1 -Wl,--as-needed -Wl,--relax -Wl,--sort-common -Wl,--gc-sections"
# This specifies additional sections to strip, for extra savings on size
STRIPFLAGS="-s -R .note -R .comment -R .gnu.version -R .gnu.version_r"
# Additional definitions, which may help some binaries to work with android
DEFFLAGS="-DNDEBUG -D__ANDROID__"
##############
### EXPERT ###
##############
# This specifies host (target) for makefiles. In some rare scenarios you may also try "--host=arm-linux-androideabi"
# In general you shouldn't change that, as you're compiling binaries for low-level ARM-EABI and not Android itself
CONFIGANDROID="--host=arm-linux-eabi"
# This specifies the CROSS_COMPILE variable, again, in some rare scenarios you may also try "arm-eabi-"
# But beware, NDK doesn't even offer anything apart from arm-linux-androideabi one, however custom toolchains such as Linaro offer arm-eabi as well
CROSS_COMPILE="arm-linux-androideabi-"
# This specifies if we should also override our native toolchain in the PATH in addition to overriding makefile commands such as CC
# You should NOT enable it, unless your makefile calls "gcc" instead of "$CC" and you want to point "gcc" (and similar) to NDKTC
# However, in such case, you should either fix makefile yourself or not use it at all
# You've been warned, this is not a good idea
TCOVERRIDE="0"
# Workaround for some broken compilers with malloc problems (undefined reference to rpl_malloc and similar errors during compiling), don't uncomment unless you need it
#export ac_cv_func_malloc_0_nonnull=yes
As you can notice, my magic script already contains bunch of optimizations, especially device-based optimizations, which are the most important. Now it's the time to run our script, but in current shell and not a new one.
Quote:
root@ArchiDroid:~# source cc.sh
Done setting your environment
CFLAGS: -O2 -march=armv7-a -mtune=cortex-a9 -mfpu=neon -mfloat-abi=softfp -s -flto=8 -ffunction-sections -fdata-sections -fvisibility=hidden -funswitch-loops -frename-registers -frerun-cse-after-loop -fomit-frame-pointer -fgcse-after-reload -fgcse-sm -fgcse-las -fweb -ftracer -fstrict-aliasing -DNDEBUG -D__ANDROID__
LDFLAGS: -Wl,-O1 -Wl,--as-needed -Wl,--relax -Wl,--sort-common -Wl,--gc-sections
CC points to arm-linux-androideabi-gcc and this points to /root/ndkTC/bin/arm-linux-androideabi-gcc
Use "$CC" command for calling gcc and "$CCC" command for calling our optimized CC
Use "$CXX" command for calling g++ and "$CCXX" for calling our optimized CXX
Use "$STRIP" command for calling strip and "$SSTRIP" command for calling our optimized STRIP
When using makefiles with configure options, always use "./configure $CONFIGANDROID" instead of using "./configure" itself
Please notice that makefiles may, or may not, borrow our CFLAGS and LFLAGS, so I suggest to double-check them and eventually append them to makefile itself
Pro tip: Makefiles with configure options always borrow CC, CFLAGS and LDFLAGS, so if you're using ./configure, probably you don't need to do anything else
Command "source cc.sh" executes cc.sh and "shares" the environment, which means that any exports will be exported to our current shell, and this is what we want. It acts the same as AOSP's ". build/envsetup.sh", so you can also use . instead of source.
As you can see above, my script should let you know if it properly set everything, especially if $CC points to our ndkTC. It also set a generic "$CCC" and "$CCXX" commands, which are optimized versions of standard $CC. $CC points to our cross-compiler, $CCC points to our cross-compiler and also includes our optimization flags.
Remember that $CCC and $SSTRIP command will only work if you source'd cc.sh script explained above. $CCC command compiles source code to a binary with already optimized flags (device flags, optimization level, optimization flags, linker flags), while $SSTRIP command strips "bloat" from output binary, such as comments and notices. The purpose is to make a binary smaller and faster.
You can check if your binary has been compiled properly through readelf command.
As you can see, I've compiled a binary optimized for ARM v7, with THUMB-2 instructions and NEON support. How nice! Is it because of device-specific flags? Let's check what happens if we use $CC instead of $CCC:
As you can see, if you do not specify flags, you'll lose major portion of optimizations. Of course binary will work properly, hence it has been cross-compiled for ARM, but we can always make it smaller and faster! :)
Step 4 - Testing
A favourite part of everything, tests! :)
In above example I pushed my binary straight to /system/bin directory, which is in the Android's PATH. If you don't have rooted device that's not a problem, you can use /data/local directory or /storage/sdcard0. You can also upload your binary anywhere you want and download it as any other file, then run from /storage/sdcard0/Download, this way doesn't require even working ADB :). Just don't forget about setting proper permissions afterwards!
Now let's try to run it! :)
If your binary is not in the PATH, you should write full path to your binary of course. As I pushed my binary to /system/bin, I don't need to do so.
If everything finished successfully and you got your very first Hello World response as above, congratulations. You've just compiled and ran your first native C/C++ program on Android device.
What to do next?
In theory, you can now compile anything you want. Here are some apps that I'm using in my ArchiDroid ROM:
Nowadays, there are many beautiful themes in miui but unfortunately they require mi credit ...
moderator edit, so it is best to support the developers by rightfully paying for them,
This post edited to reflect the Standards and Rules of XDA, to wit - 6. Do not post warez.
If a piece of software requires you to pay to use it, then pay for it. We do not accept warez and nor do we permit any member to request, promote or describe ways in which warez, cracks, serial codes or other means of avoiding payment, can be obtained. This is a site of developers, i.e. the sort of people who create such software. When you cheat a software developer, you cheat us as a community.
I'm looking for a developer who can create a Tool/Android Emulator with custom features for my internal usage,
They're many Android Emulators online but none of them have things which i require.
So if you're a developer and know to create then contact me through PM or write down here in this thread.
Note to Developer/Creater :
1) Make sure this Tool/Emulator must work on multiple OS (Windows, Mac OS X, etc...)
2) Tool must be Headless with GUI optionally
3) You must give me the Source Code
4) You are NOT Permitted to share the same tool anywhere else or sell it, I will own 100% rights of Source Code
5) Android Emulator must be ROOTED
6) Must be compitable with GAPPS (Play Store, etc...)
7) Must have Custom features (I'll PM you)
And dont worry, If you are able to do then we may have a deal ;)
I have been working on superuser from the past one year or so and have had several failures to start with went into some of the java and c++ courses for revising my Knowledge and what i could do.
So i started the project PowerShell based on Koush's Superuser and all the enhancement i could do to the binaries and the App
I have done the full optimization on the level on the su binaries and made PowerShell Appication more faster
@Audio God and @Akshay (Aky) and some of the other friends.
and some help from @Mazda or commonly known as Alex cruz on google+
I made PowerShell i dont Know How i am gonna get a response on this but i believe some may like it or some may not.
I also like the fact that some ppl on Google+
still are responding to it in a positive way.
@Chainfire in this process helped me know more about calling su at the proper time with his blog and everything with that could be useful
with is "How to Call Su " I credit and a Thanks to him he is the mater on this
On the basis of GPL and licenses to the binaries as it is they are Licensed to koush and Adamshanks
I will also upload the github Source to the work and the App as well as the Binaries and how to add them to your own Rom when i myself start my own Rom project this week. but powershell will still not be included in the Rom until gets the capability to install through app as well as Recovery
the ability to hide root and as well as full uninstall and reach complete stability.
I have been reported some testers that it is stable and works properly as it shoudl
some apps had some problem with superuser
Namely they were :-
Go backup, secure settings, Titanium backup and some may report more report me which apps work with PowerShell and not with superuser and those not working with both but with SuperSu.
In the app You will find the same Layout of superuser i will change that this week until everything expected works properly dont expect fragments from me in slide menu or like SuperSu i will find a workaround what i should do.
another Thing i noticed was when flashed on devices < 4.3 with default shell as system/xbin/sh its hanged the device so i kept the default shell as system/bin/sh and made it listen for su at system/xbin/su and that sorted out most of the problems
The daemon still works as it should.
with the same line as SuperSu i am also putting some init.d scripts as well in the next beta to PowerShell calls the storage/emulated/legacy and mnt/shell/emulated/0 on nexus devices on boot.
There will also be a playstore Release as well
I am stuck in a situation where i have to get my problem with my website sorted out and gerrit sorted out.
until monday or tuesday i will sort out the problem
I will also start my Rom project on that day.
I want conributors who can contribute to the Rom as well some maintainers who can maintain devices
here is the Repository www.github.com/JafierRoms
and this is my repository www.github.com/Kingrehan
Thanks to Koushik Dutta, Adam Shanks to opensource superuser and binaries respectively.
and @Chainfire for his blog on "how to su"
and all the friends in the process who wanted me to do that
Thanks to all of You.
Suggestions are welcomed
if some developer can do me a favor and compile libsuperuser_exaple and post it here so ppl can test powershell and put the effect of Powershell properly.
for logcat use Catlog or DDMS in ECLIPSE and post the Whole Logcats and help me improve PowerShell
You are flashing the zip through any custom recovery on your own self and by your own concern i am not responsible for any damage
you would void your warranty
if devciesn hang on less than android version 4.3 reflash supersu
Description:
Hello guys, this is my newest work for all android devices, is a simple engine focused on a good performance and battery saving, I know, it does a great job, but I did my best and I guarantee you will enjoy, you will not even see a LAG on your device.
Unlike many engines out there, the MaliveBooster is not based on AdrenalineEngine, or anywhere else, I created it from scratch to make the best of my device, she had several contributions of many of my friends who encouraged me to create it.
Features:
✔ Increase touchscreen sensitivity
✔ Less battery consumption
✔ Small and simple SD-Card read ahead script, configured to work with "4096 KB"
✔ Faster Ext4 File-Systems optimization & instant-mount
✔ Wireless Speed Tweaks
✔ Graphics Enhancement
✔ Custom Sysctl (made by myself)
✔ Optimized overall performance
✔ Photo and video recording quality considerably increased
✔ CWM Flashable
✔ Custom Hosts
✔ Easy to uninstall
✔ Turns your mobile phone into an incredible Galaxy S5. (joke , haha)
**Do a backup before your try anything as usual !!!
Installation:
1.Delete all others ram scripts you have installed in "/system/etc/init.d"
2. Copy 'MaliveBooster' to your phone SD card
3. Reboot your phone to recovery mode
4. Mount /system
5. Flash MaliveBooster
6. Reboot your phone when finished installation
7. Done
I have 4.0.3 version on my ninetology stealth i7520 version which I bought in Malaysia. I would like to know if I can install the newest version of Android or any other higher version? Basically this device has only 512 mb ram,1.0 GHz processor and 500mb + 2 Gb internal memory. So I dont know whether anyone had experience on rooting this device on higher versions, if yes, how does it work? any trouble as ram isnt so large?
thanks for your advises.
I've the following problem. I have the tablet (Coby Kyros mid1024) with broken and totally unfunctional touchscreen, so it means that I can do nothing with it. The LCD is working well...
I can't turn on WiFi, Bluetooth, turn on the debug mode...rooting...anything.
I've spent all the day by looking for the touchscreen replacement but with no luck :( But,
what I need by now - Is there any possibility (boot it from the SD card or something like that) to go over the lock/unlock screen and to get remote control of the tablet by the PC (through mini USB, for example)?
My aim is to turn off the lock screen after rebooting and to get the possibility to control the tablet by mouse over bluetooth or USB. But for this I need to turn off the lock screen first and to setup the bluetooth or USB...I thing...
I'm using latest aroma installer for my volume mod posted here. I uploaded it and it worked great, but later I realised that it doesnt work on some recoveries/kernels and I have no idea why. I've read the rules and this board is for me. I actually want to learn WHY it sometimes didn't work and what I've done wrong. Also some tips on how do I add a new menu (not a new checkbox etc.).
I've tried to understand it myself, but I couldn't.
In the time I’ve spend dealing with open source projects and just being around fellow developers, I’ve found that there are a few things that should not happen but continue on happening.
Why does this happen?
Maybe a case of laziness, maybe they are trying to hide something….who knows but one thing that is sure is that it should not happen.
What I’m speaking of is people uploading repos without commit history. It bugs the living hell out of me. It does because sometimes I’m trying to learn how to do something and without commit history, is kind of difficult to do so. I mean, some brag that they’re 100 percent open source but I don’t think you can claim that without commit history in place.
Also, you can’t complain if you’re not willing to provide a solution to the problem….right?
Ok, well I will go ahead and provide a simple step by step way of uploading a repo with commit history as well as provide screenshots for those that learn by seeing.
So let’s say you want to upload a repo to your github but you don’t want to fork it for one reason or another.
I personally like to upload repos instead of forking them ONLY because I had a case back during Android 4.1.2 where I forked AOKP’s frameworks_base repo and some how it got corrupted and github claim that there was nothing they could do because it was a fork.
This made me mad and ever since I upload repos with commit history instead of just fork them on github.
Anyways, let’s start……
Find that repo and copy the HTTPS clone URL
Open up a terminal then type in "git clone + the https URL"
Press Enter and let it do it's thing
Now head over to github and create a repo, this is important
Now type in the name of the repo (whatever you want) and hit "Create repository"
You will be prompted with a screen like below, the bottom part is what we'll be using
Open up a terminal and navigate to the repo you git cloned above
Ok so when you fork a repo, you usually have a .git folder and with that it has a origin. Where it came from and what is used to know where to push to if you typed in something like git push origin or whatever. With that said, you have now git clone this repo and are wanting to upload it but yet keep commit history. So you need to type in the following command to remove the origin and have it pointing to your newly created repo
Keep in line with the step above, type in "git remote rm origin"
With all repos, you have branches. Branches are generally used to create snapshots of your work but sometimes used to work on other things while keeping the main goal in place and not having to create another repo. For example, if I had a repo that is used for KitKat 4.4.2 but Google decides to push 4.5 or 5.0 or whatever and I want to keep the work I did on 4.4.2, I would simply create another branch and use it for 4.5 or 5.0 or whatever.
With that said, you need to create a branch to start things off since this will a new repo....at least for you it is.
Type in "git branch master" and you'll find sometimes it exists, sometimes it doesn't. If it does then that's good......don't freak out! Just means you don't need to do this step :)
Ok after this you will need to go back to your github repo you created not so long ago and find the two lines I highlighted/had arrows pointing to and copy/paste them into terminal
Make sure you type in your Github username/password when prompted and the end result should look like this
ENJOY and hopefully this will help someone that doesn't exactly want to hide their kanging tracks but just doesn't know how to upload a repo with commit history!
Hi, have problem with restore script. This script is for init.d. First boot with restore app and app data. Have problem with restore app data. If run script for restore app data then restore only from one tar.gz file, no from all. Where problem? Thanks
App restore:
#!/system/bin/sh
su
mount -o remount,rw /system
mount -o remount,rw /data
for filename in /system/app2/*.apk;
do
busybox install $filename /data/app;
done
I have a LG Optimus L5 II at this point in time there is now way to unlock my bootloader.
after some research I noticed that other devices can get CWM on there phones with locked bootloader. but I did not find any tutorials explaining how to do this. so I decided to write this tutorial to help everybody in the same situation.
Disclaimer
Code:
* Your warranty is now void.

* I am not responsible for bricked devices, dead SD cards,

* thermonuclear war, or you getting fired because the alarm app failed. Please

* do some research if you have any concerns about changes made using this guide

* before using it! YOU are choosing to make these modifications, and if

* you point the finger at me for messing up your device, I will laugh at you.
basically when your phone boots it starts it begins to load the system.
when the system loads it starts t read a series of files. we intercept the files and tell it to stop loading and launch cwm from a tar file.
because you phone is loading it has already passed the check to see if the system is secure(IE checks that its not loading a custom software).
this process is called 2nd init.
Step 2
getting your phone to load a script at startup.
so now we have to get a script to load on startup. there are numerous ways of doing this. the most universal way is to use init.d.
because your bootloader is locked you most likely dont have init.d support.
to give support we need to change the install recovery file located
Code:
/system/etc/install-recovery.sh
this file is present on most devices. when your phone loads this file we will tell it to execute all files in /system/etc/ini.d
attached is a init.d installed that you can download so you dont have to manualy change anything yourself.
Step 3
Making sure script are loading on startup.
in the previous step I included a init.d script called datetest.
after completing step 2 restart your phone.
using root explorer go to
Code:
/data/local/tmp/
there should be a file called
Code:
init.d_log_test.txt
if you open that file you should have the date and time that the script was run.
Step 4
Installing the custom script.
Now that we have init.d support all we need to do is install the script
once again I have included a recovery installer.
this will put the unsecureboot in the init.d folder as well as create a folder in your system directory called bootstrap with all required files
Step 5
Getting the key
when the script is executed it will run the key check to identify what key is being pressed. in my case the vol + key is 115
if the correct key is being pressed it will launch the recovery.
to identify the correct key
use root explorer and navigate to
Code:
/system/bootstrap
open the file get key and select open as script
press execute and press the key you want to use to launch the recovery.
you need to do this at the same time
it will then return the key being pressed
if it returns -1 then it is not identifying the key try a different key.
Step 6
Modding the script
open the init.d script 001unsecureboot
find this line
Code:
if $BB [ "$key" = 115 ]; then
replace the key with the key you got from the previous post
Step 7
Modding the Recovery
I have never ported a recovery before so i am not sure what needs to be changed in the recovery.tar
I was lucky enough for the recovery to work out of the box. with a few minor adjustments to the recovery.fstab.
but if you are familiar with cwm I am sure you will be able to understand.
Step 8
Rebooting to Recovery
there are two ways of doing this.
ether reboot and keep pressing the key that you selected
or you can run the app provided.
Step 9
Enjoy
now you should have CWM on your phone with a locked bootloader.
If not please leave me a comment. I will try my best to identify the problem.
FEATURES
This script is based on a couple of scripts Victod with performance improvements and enhancements RAM Dual Swap and FSTRIM ADVANCED FEATURES
-Dual Swap system and cache (383992KB swap (383MB SWAP)
-Improve the performance of your cell
-On FSTRIM in DATA / SYSTEM / CACHE (To learn more is FSTRIM visit this link) (Link)
-Improved loading the ext4 partitions
REQUIREMENTS
-Kernel with swap (recommended kernels chil and CeXtel)
-Kernel/ROM with Init.d (recommended kernels chil and CeXtel)
INSTRUCTIONS
1º copy the script to the sd or internal
2º wipe cache
3º Flash the zip
4º reboot and enjoy the script
CHANGELOGS
V1:Inicial
TESTED DEVICES
-Huawei ascend G510/Y300 WITH 4.1/4.4.2
Welcome To Dash Mod
Dash mod?? My Frist script ,Its a lite script depends on tweeking build prop To Give U Smooth, Fast and Clean Rom u will feel The Diffrence Ur self Also Dash Mod Clears most of mods so u can use ur favourite mod after flashing dash mod without having any Conflict ,that is also a catalyst for legacy devices gives them more power
Change Log
Code:
V0.1
-BackUP Orignal build.prop to SD/Dash-Mod/
-Boot Time Reduced Alot ( Will Reduce more by odexing ur rom (Give a try)
-Also Shutdown Time Reduce
-Faster 3G
-Faster 2G
-Faster Wifi
-Hides USB Debugging Notify(But adb works)[Exprmintal]
-Fixes blackscreen After Calls (CM ) Sensors related
-Improved scorl speed
-Improved Imgs Quality
-Preformance Tunning
-Vedio HW Accelration
-Fixes Some Bugs In Apps
-Reduces Lags In Games
That MOD Will/May
Remove Previus Mods To Give U The Cleanest MOD Ever
Have you ever wanted your XCover to look more like the newer phones? Then, I have a solution for you! I have modified the system apk's of the Galaxy XCover to be the same as on ICS and JB, and i have updated the notification bar icons so they will look like the ICS ones! I have also added the ICS Launcher icons, so your original launcher can look more like Android 4.x without using any custom launchers and themes! Here's a list of the updated apk's:
Browser.apk
Calendar.apk
Camera.apk
Contacts.apk
DeskClock.apk
DialerTabActivity.apk
DownloadProviderUi.apk
Email.apk
FmRadio.apk
Gallery3D.apk
Gmail.apk
MMS.apk
Music.apk
MyFiles.apk
Settings.apk
SystemUI.apk
TouchWiz30Launcher.apk
TouchWizCalculator.apk
Voicerecorder.apk
NOTE! This mod MAY work for other Gingerbread devices, as long as they are medium dpi (160) so the icons work AND you wont be ending up with a phone that has 3/4 of the system apps unusable.
Please, if you have anything that you don't like in the apk's (wrong sized icon, blurry icon, force closes etc..) please tell me! I will fix them as soon as I can :)
! REMEMBER TO BACKUP /system/app/ JUST IN CASE !
Installing my theme:
1. Go to CWM Recovery and wipe cache, and dalvik-cache
2. Flash ICS ICONS.zip
3. Reboot & Enjoy!
I try to mod a rom but I have this problem : I've added apk in /system/app.
After the boot, if I open the applications view, siome of them use little icon and some other normal icon
Launcher used : JB launcher2
Any idea to have the same size for all ?
By the way, if I install an application thru the Playstore, it is the same problem : it will have small icon
hi guys
I'm minhdangoz from Mobiistar Vietnam.
As you guys know Q1000 Opus and LAI 504Q has the same hw specs and we can use the SW of 504Q for Q1000 Opus.
Pls don't confuse Q1000 Opus with Q1000
Q1000 Opus: BCM23550
Q1000: MTK6589
okay, I will start with the stock ROM.
If your device can not boot up or can not enter to recovery mode, boot-loader mode but still vibate when press power button. It's just soft-brick and we can use the Flashtool to flash the stock ROM.
V009 is the lasted SW of Mobiistar touch LAI 504Q.
I'm going to start on my first costume rom for note 3. We're can I find a stock note 3 sm-n900t pre rooted rom to customize? I'm new to customizing roms so please be nice . I'd be thank full for any help thanks
Pgag
Sent from my SM-N900T using xda app-developers app