When Android asks me, which App should perform an action (intent) and I select one of the proposed Apps and click to "Always", where does Android then store (persist) my selection?
I suppose, this must be in some file (where else?). Does anyone of you know, in which file?
I would like to view (and maybe change) the contents of this file on my rooted phone.
I know, how to reset the associations of an given App, but this is not what I am looking for.
The Android open-source project (AOSP) is quite complex and it can be hard to find a good way to get more familiar with it. Im going to try a practical approach, by describing the relevant parts of the build process.
Note - I recommend reading my this guide before you through this one just in case you are actually gonna read and learn. :)
This guide explains the whole android build process right from envsetup.sh to the working and understanding of makefiles to Package complete! :D
The Beginning(envsetup.sh)
It all gets started with the
Code:
. build/envsetup.sh
command. What it basically does is that it adds a number of commands to your environment which you later use for building Android for your device.
The commands are listed below -
Code:
- lunch:   lunch <product_name>-<build_variant>

- tapas:   tapas [<App1> <App2> ...] [arm|x86|mips|armv5] [eng|userdebug|user]

- croot:   Changes directory to the top of the tree.

- cout:    Changes directory to out.

- m:       Makes from the top of the tree.

- mm:      Builds all of the modules in the current directory.

- mmp:     Builds all of the modules in the current directory and pushes them to the device.

- mmm:     Builds all of the modules in the supplied directories.

- mmmp:    Builds all of the modules in the supplied directories and pushes them to the device.

- mma:     Builds all of the modules in the current directory, and their dependencies.

- mmma:    Builds all of the modules in the supplied directories, and their dependencies.

- cgrep:   Greps on all local C/C++ files.

- jgrep:   Greps on all local Java files.

- resgrep: Greps on all local res/*.xml files.

- godir:   Go to the directory containing a file.

- cmremote: Add git remote for CM Gerrit Review.

- cmgerrit: A Git wrapper that fetches/pushes patch from/to CM Gerrit Review.

- cmrebase: Rebase a Gerrit change and push it again.

- aospremote: Add git remote for matching AOSP repository.

- cafremote: Add git remote for matching CodeAurora repository.

- mka:      Builds using SCHED_BATCH on all processors.

- mkap:     Builds the module(s) using mka and pushes them to the device.

- cmka:     Cleans and builds using mka.

- repolastsync: Prints date and time of last repo sync.

- reposync: Parallel repo sync using ionice and SCHED_BATCH.

- repopick: Utility to fetch changes from Gerrit.

- installboot: Installs a boot.img to the connected device.

- installrecovery: Installs a recovery.img to the connected device.
It also scans for the 'vendorsetup.sh' files in your source and display them in this form -
Code:
including device/generic/armv7-a-neon/vendorsetup.sh

including device/generic/goldfish/vendorsetup.sh

including device/generic/mips/vendorsetup.sh

including device/generic/x86/vendorsetup.sh

including vendor/cm/vendorsetup.sh

including sdk/bash_completion/adb.bash

including vendor/cm/bash_completion/git.bash

including vendor/cm/bash_completion/repo.bash
The file is responsible for -
All the make device calling, make etc. commands are possible only after you execute the envsetup.sh file. :)
It also scans and does some magic stuff with the build/core directory.
It also displays choices of variant for the selected device, like 'userdebug', 'user', 'eng'.
It is also responsible for performing the most important step, it sets up the android build paths and and sets up the toolchains for the build process.
It also calls java and sets it parameters for the compilation.
It displays the default device configurations that are -
It calls the 'roomservice.py' file in build/tools folder which is responsible for finding and downloading the device sources from CyanogenMod's github if they don't exist.
The file also contains the CWM and TWRP commands to sideload the product files into the device.
It also gets bug reports from the device to the machine for the developers to work upon. :)
The lunch/brunch Command
Next thing is to select target using the lunch menu, which was added to your bash shell environment after sourcing envsetup.sh. After making your selection, the chosen product and variant is verified and environment variables are set, including:
export TARGET_PRODUCT=$product The chosen product
export TARGET_BUILD_VARIANT=$variant The chosen variant
export TARGET_BUILD_TYPE=release Only release type is available. Use choosecombo if you want to select type.
export ANDROID_BUILD_TOP=$(gettop) The build root directory.
export ANDROID_TOOLCHAIN=... The toolchain directory for the prebuilt cross-compiler matching the target architecture
export PATH=... Among other stuff, the prebuilt toolchain is added to PATH.
export ANDROID_PRODUCT_OUT=... Absolute path to the target product out directory
export ANDROID_HOST_OUT=... Absolute path to the host out directory
The usage is pretty simply, you can just type 'lunch' and you'll be prompted with the list of devices that you can build for with the sources present or you can just type 'lunch cm_<device_name>-<variant_type>'.
The lunch command actually fixes the target for the build process and is responsible for the paths getting locked and the device configurationto be used and applied to the source. :D
It actually gets to use only after there is a vendorsetup.sh file in your device tree which is responsible for adding the lunch combo(Which shows up in the list of devices when you simply run lunch) of your device.
The MAKE Command
The purpose of the make utility is to determine automatically which pieces of a large program need to be recompiled, and issue the commands to recompile them. The manual describes the GNU implementation of make, which was written by Richard Stallman and Roland McGrath. The following examples show C programs, since they are most common, but you can use make with any programming language whose compiler can be run with a shell command. In fact, make is not limited to programs. You can use it to describe any task where some files must be updated automatically from others whenever the others change.
To prepare to use make, you must write a file called the makefile that describes the relationships among files in your program, and the states the commands for updating each file. In a program, typically the executable file is updated from object files, which are in turn made by compiling source files.
Once a suitable makefile exists, each time you change some source files, this simple shell command:
Code:
make
suffices to perform all necessary recompilations. The make program uses the makefile data base and the last-modification times of the files to decide which of the files need to be updated. For each of those files, it issues the commands recorded in the data base.
make executes commands in the makefile to update one or more target names, where name is typically a program. If no -f option is present, make will look for the makefiles GNUmakefile, makefile, and Makefile, in that order.
Normally you should call your makefile either makefile or Makefile. (I recommend Makefile because it appears prominently near the beginning of a directory listing, right near other important files such as README.) The first name checked, GNUmakefile, is not recommended for most makefiles. You should use this name if you have a makefile that is specific to GNU make, and will not be understood by other versions of make. If makefile is `-', the standard input is read.
make updates a target if it depends on prerequisite files that have been modified since the target was last modified, or if the target does not exist.
Makefile Execution
The make command executes the commands in the makefile line by line. As make executes each command, it writes the command to standard output (unless otherwise directed, for example, using the -s flag). A makefile must have a Tab in front of the commands on each line.
When a command is executed through the make command, it uses make's execution environment. This includes any macros from the command line to the make command and any environment variables specified in the MAKEFLAGS variable. The make command's environment variables overwrite any variables of the same name in the existing environment.
Note:
Quote:
When the make command encounters a line beginning with the word include followed by another word that is the name of a makefile (for example, include depend), the make command attempts to open that file and process its contents as if the contents were displayed where the include line occurs. This behavior occurs only if the first noncomment line of the first makefile read by the make command is not the .POSIX target; otherwise, a syntax error occurs.
Comments: Comments begin with a # character, anywhere but in a shell command line, and continue to the end of the line.
Environment: The make command uses the MAKEFLAGS environment variable, if it exists.
Target Rules
Target rules have the following format:
target[target...] : [prerequisite...] [;command]
<Tab>command
Multiple targets and prerequisites are separated by spaces. Any text that follows the ; (semicolon) and all of the subsequent lines that begin with a Tab character are considered commands to be used to update the target. A new target entry is started when a new line does not begin with a Tab or # character.
That was the most important part of the build process, where make files are resposible for compiling almost each of the files in the source and putting them together for the useful apps/binaries/libraries etc. :D
Build Tricks
Used from wiki.
Seeing the actual commands used to build the software
Use the "showcommands" target on your 'make' line:
$ make -j4 showcommands
This can be used in conjunction with another make target, to see the commands for that build. That is, 'showcommands' is not a target itself, but just a modifier for the specified build.
In the example above, the -j4 is unrelated to the showcommands option, and is used to execute 4 make sessions that run in parallel.
Make targets
Here is a list of different make targets you can use to build different parts of the system:
make sdk - build the tools that are part of an SDK (adb, fastboot, etc.)
make snod - build the system image from the current software binaries
make services
make runtime
make droid - make droid is the normal build.
make all - make everything, whether it is included in the product definition or not
make clean - remove all built files (prepare for a new build). Same as rm -rf out/<configuration>/
make modules - shows a list of submodules that can be built (List of all LOCAL_MODULE definitions)
make <local_module> - make a specific module (note that this is not the same as directory name. It is the LOCAL_MODULE definition in the Android.mk file)
make clean-<local_module> - clean a specific module
Helper macros and functions
There are some helper macros and functions that are installed when you source envsetup.sh. They are documented at the top of envesetup.sh, but here is information about a few of them:
croot - change directory to the top of the tree
Code:
m - execute 'make' from the top of the tree (even if your current directory is somewhere else)

mm - builds all of the modules in the current directory

mmm <dir1> ... - build all of the modules in the supplied directories

cgrep <pattern> - grep on all local C/C++ files

jgrep <pattern> - grep on all local Java files

resgrep <pattern> - grep on all local res/*.xml files

godir <filename> - go to the directory containing a file
Speeding up the build
You can use the '-j' option with make, to start multiple threads of make execution concurrently.
In my experience, you should specify about 2 more threads than you have processors on your machine. If you have 2 processors, use 'make -j4', If they are hyperthreaded (meaning you have 4 virtual processors), try 'make -j6.
You can also specify to use the 'ccache' compiler cache, which will speed up things once you have built things a first time. To do this, specify 'export USE_CCACHE=1' at your shell command line. (Note that ccache is included in the prebuilt section of the repository, and does not have to be installed on your host separately.)
Building only an individual program or module
If you use build/envsetup.sh, you can use some of the defined functions to build only a part of the tree. Use the 'mm' or 'mmm' commands to do this.
The 'mm' command makes stuff in the current directory (and sub-directories, I believe). With the 'mmm' command, you specify a directory or list of directories, and it builds those.
To install your changes, do 'make snod' from the top of tree. 'make snod' builds a new system image from current binaries.
Setting module-specific build parameters
Some code in Android system can be customized in the way they are built (separate from the build variant and release vs. debug options). You can set variables that control individual build options, either by setting them in the environment or by passing them directly to 'make' (or the 'm...' functions which call 'make'.)
For example, the 'init' program can be built with support for bootchart logging by setting the INIT_BOOTCHART variable. (See Using Bootchart on Android for why you might want to do this.)
You can accomplish either with:
$ touch system/init/init.c
$ export INIT_BOOTCHART=true
$ make
or
$ touch system/init/init.c
$ m INIT_BOOTCHART=true
At last, after makefiles optimize all the processes and build the device specific parts including binaries and libs and apps necessary for it to get booted, the 'system' folder and the 'boot.img' folder are prepared in the out/target/product/device. The META-INF folder is prepared at instance and the system and boot.img are packed into a zip file(whose name is also processed by the makefiles ;) ) and md5 sum prepared. The flashable zip gets prepared only if you run the "brunch" command or "lunch + mka" command. :)
The Build Tricks aren't *for fun*. This stuff is always gonna help you in the long run! :D
Credits -
>Firstly, my parents. :)
>Google, for Android!
>All the people over xda who have written awesome guides and done great works(Because that's what inspires me)
> @galaxyfreak , @speed_bot, @Red Devil, @thewisenerd, @vishal_android freak and all others who helped me every time and answered every(sensible) question of mine.
>The CyanogenMod, AOKP and OmniROM team! :)
> All those whom I missed. :)
Introducing You My Concept For Rom Porting And Uploading."Easier to Upload with Slow and Low Data Pack For Rom Porter Devs."
Concept:-
What Earlier Rom Devs or Porters Were Doing:-They download a rom to port from other device and then port it and upload it for their device.
With Concept X Now Rom Porters can Do:-
Now they need to download the rom they want to port but they will need only to upload 10-25MB file.How?See below...
*Instead of uploading full Rom,you should only upload your changed files flash-able zip via CWM.
For Example:-
Quote:
If i ported a rom by modifying boot.img,apps,libs,firmwares etc....then insted of uploading full rom i will upload only a patch with all files which are to be replaced while porting.Then i will give the users the link of PORT rom from which i ported my rom and also the patch which i created.
Before You begin check that PORT Rom contains no uboot.bin,recovery and assert device line at the top of updater script.This will brick your device.
Try only if your Rom have only folders and files from list below:-
#data(folder)
#META-INF(folder)
#System(folder)
#Boot.img(file)
#Logo.bin(file)
Do not try if Rom have these files or folder structure in the Port Rom zip:-
#uboot.bin
#IK.bin
#recovery.img
#assert device line at the top of updater script.
#Different Mount Points under Updater script.
I ported 6 Roms From A116 to A110Q successfully:laugh: and applied this method i saved lots of DATA and Money.You can Find my Concept "X" based Roms in my signature Jelly bean section.This method will work perfectly if your PORT Rom meet above criteria.
How To Do:-
1) Download you PORT rom which you wanna port.
2) Port your Rom and Keep in mind the files you changed for porting.
3)Now Download my patch zips from below and open with 7zip.You can do it yourself if you have knowledge about updater scripts.
4)Now make directories according to your files changed during porting and add those files by dragging into my patch zip.
5)Flash the Untouched PORT Rom(in which no changes made) and then after flashing it flash patch zip which you created by above method.
6)Now your Rom should boot if you ported successfully.
How to use My Concept "X" Patch zip:-
1)open my zip with 7zip and you will see following files/folder structure:-
#data
#META-INF
#system
#boot.img
#logo.bin
#uboot.bin
2)Remove the folders/files which you don't need to change in PORT rom.Means if you are not changing uboot.bin,logo.bin,data etc then delete these files/folders from zip without extracting with 7zip.
3)For example if you ports a rom by replacing
[COLOR="rgb(255, 140, 0)"]boot.img
system/etc/firmware
system/lib/modules
system/lib/hw
system/vendor
system/build.prop[/COLOR]
then you will delete uboot.bin,logo.bin.data from my patch zip.Now you only need to modify updater script according to your file/folder changes in patch zip.
4)Drag drop updater script from my zip to anywhere in pc,then edit with notepad++.
5)Above we deleated uboot,data,logo from zip so we will Put "#" in front of the line which executes that folder/file.See below:-
Updater script provided in my zip:-
I'd like to share with you effect of nearly 200 hours spent on trying to optimize Android and push it to the limits.
In general. You should be already experienced in setting up your buildbox, using git, building AOSP/CyanogenMod/OmniROM from source and cherry-picking things from review/gerrit. If you don't know how to build your own ROM from source, this is not a something you can apply to your ROM. Also, as you probably noticed, this is not a something you can apply to every ROM, as these optimizations are applied during compilation, so only AOSP roms, self-compiled from source may use this masterpiece.
So, what is it about? As we know, Android contains a bunch of low-level C/C++ code, which is compiled and acts as a backend for our java's frontend and android apps. Unfortunately, Google didn't put their best at focusing on optimization, so as a result we're using the same old flags set back in 2006 for Android Donut or anything which existed back then. As you guess, in 2006 we didn't have as powerful devices as now, we had to sacrifice performance for smaller code size, to fit to our little devices and run well on very low amount of memory. However, this is no longer a case, and by using newest compilers such as GCC 4.8 and properly setting flags, we can achieve something, which I call "Android in 2014".
You probably may heard of some developers claiming using of "O3 Flags" in their ROMs. Well, while this may be true, they've applied only to low-level ARM code, mostly used during kernel compilation. Additionally it overwrites O2 flag, which is already fast, so as you may guess, this is more likely a placebo effect and disappears right after you change the kernel. Take a look at the most cherry-picked "O3 Flags commit". You see big "-Os" in "TARGET_thumb_CFLAGS"? This is what I'm talking about.
However, the commit I'm about to present you is not a placebo effect, as it applies flags to everything what is compiled, and mostly important - target THUMB, about 90% of an Android.
Now I'll tell you some facts. We have three interesting optimization levels. Os, O2, O3. O2 enables all optimizations that do not involve a space-speed tradeoff. Os is similar to O2, but it disables all flags that increase code size. It also performs further optimizations to reduce code size to the minimum. O3 enables all O2 optimizations and some extra optimizations that like to increase code size and may, or may not, increase performance. If you want to ask if there's something more like O4, there is - Ofast, however it breaks IEEE standard and doesn't work with Android, as i.e. sqlite3 is not compatible with Ofast's -ffast-math flag. So no go for us.
Now here comes the fun part. Android by default is compiled with O2 flag for target ARM (about 10% of Android, mostly kernel) and Os flag for target THUMB (about 90% of Android, nearly everything apart from kernel). Some guys think that Os is better than O2 or O3 because smaller code size is faster due to bettering fitting in cpu cache. Unfortunately, I proven that it is a myth. Os was good back in 2006, as only with this flag Google was able to compile Dalvik and it's virtual machine while keeping good amount of free memory and space on eMMC cards. As or now, we have plenty of space, plenty of ram, plenty of CPU power and still good old Os flag for 90% of Android.
Now you should ask - where is your proof?, here I have it for you:
As you may noticed, I compiled whetstone.c benchmark using three different optimization flags - Os, O2 and O3. I repeated each test additional two times, just to make sure that Android doesn't lie to me. Source code of this test is available here and you may download it, compile for our beloved Android and try yourself. As you can see O3 > O2 >> Os, Os performs about 2.5x times worse than O2, and about 3.0x times worse than O3.
But, of course. Android is not a freaking benchmark, it's operating system. We can't tell if things are getting better or worse according to a simple benchmark. I kept that in mind and provided community with JustArchi's Mysterious Builds for test. I gave both mysterious builds and didn't tell them what is the mysterious change. Both builds have been compiled with the same toolchain, same version, same commits. The one and only mysterious change was the fact that every component compiled as target thumb (major portion of an android) has been optimized for speed (O3) in build #1 (experimental), and optimized for size (Os) in build #2 (normal behaviour). Check poll yourself, 9 votes on build 1 in terms of performance, and 1 vote on build 2. I decided that this and benchmark is enough to tell that O2/O3 for target thumb is something that we want.
Now the battle is, O2 or O3? This is tough choice, here are some facts:
1. Kernel compiled with O2 has 4902 KB, with O3 4944 KB, so O3 is 42 KB bigger.
2. ROM compiled with O3 is 3 MB larger than O2 after zip compression. Fast overview: 97 binaries in /system/bin and 2 binaries in /system/xbin + 283 libraries in /system/lib and other files, about 400 files in total. 3 MB / 400 = 7,5 KB per file size increase.
3. No issues
In general, I doubt that this extra chunk of code may cause any significant memory usage or slower performance. I suggest to use O3 if it doesn't cause any issues to you compared to O2, but older devices may use O2 purely for saving on code size, similar way Google did it back in 2006 using Os flag.
- Updated GCC to 4.8, as it performs much better than default 4.7 and gives excellent results
- Optimized for speed yet more all instructions - ARM and THUMB (-O3)
- Turned off all debugging code (-DNDEBUG)
- Performed loop invariant motion on trees. It also moved operands of conditions that are invariant out of the loop, so that we can use just trivial invariantness analysis in loop unswitching. The pass also includes store motion (-ftree-loop-im)
- Created a canonical counter for number of iterations in loops for which determining number of iterations requires complicated analysis. Later optimizations then may determine the number easily (-ftree-loop-ivcanon)
- Performed induction variable optimizations (strength reduction, induction variable merging and induction variable elimination) on trees (-fivopts)
- Tried to reduce the number of symbolic address calculations by using shared “anchor” symbols to address nearby objects. This transformation can help to reduce the number of GOT entries and GOT accesses on some targets (-fsection-anchors)
- Assumed that loop indices do not overflow, and that loops with nontrivial exit condition are not infinite. This enables a wider range of loop optimizations even if the loop optimizer itself cannot prove that these assumptions are valid (-funsafe-loop-optimizations)
- Allowed the compiler to assume the strictest aliasing rules applicable to the language being compiled. For C (and C++), this activates optimizations based on the type of expressions. This is only applied to compatible Android parts (-fstrict-aliasing)
- Placed each function and data item into its own section, this is required for -Wl,--gc-sections (-ffunction-sections -fdata-sections)
- Moved branches with loop invariant conditions out of the loop (-funswitch-loops)
- Attempted to avoid false dependencies in scheduled code by making use of registers left over after register allocation. This optimization most benefits processors with lots of registers (-frename-registers)
- Re-ran common subexpression elimination after loop optimizations are performed (-frerun-cse-after-loop)
- Didn't keep the frame pointer in a register for functions that don't need one. This avoids the instructions to save, set up and restore frame pointers; it also makes an extra register available in many functions (-fomit-frame-pointer)
- Made a redundant load elimination pass performed after reload. The purpose of this pass is to clean up redundant spilling (-fgcse-after-reload)
- Ran a store motion pass after global common subexpression elimination. This pass attempts to move stores out of loops (-fgcse-sm)
- Eliminated redundant loads that come after stores to the same memory location, both partial and full redundancies (-fgcse-las)
- Constructed webs as commonly used for register allocation purposes and assigned each web individual pseudo register. This allows the register allocation pass to operate on pseudos directly, but also strengthens several other optimization passes, such as CSE, loop optimizer and trivial dead code remover (-fweb)
- Performed tail duplication to enlarge superblock size. This transformation simplifies the control flow of the function allowing other optimizations to do a better job (-ftracer)
- Optimized GNU linker, which significantly reduces launching time and memory usage. This is especially visible during booting process, which is a few seconds faster than usual (-Wl,-O1)
- Applied special --as-needed flag to GNU linker. The flag tells the linker to link in the produced binary only the libraries containing symbols actually used by the binary itself. This not only improves startup times (as the loader does not have to load all the libraries for every step) but might avoid the full initialization of things, which we're not even physically able to use (-Wl,--as-needed)
- Performed global optimizations that become possible when the linker resolves addressing in the program, such as relaxing address modes and synthesizing new instructions in the output object file (-Wl,--relax)
- Sorted the common symbols by alignment in descending order. This is to prevent gaps between symbols due to alignment constraints (-Wl,--sort-common)
- Enabled garbage collection of unused input sections, thanks to -ffunction-sections and -fdata-sections (-Wl,--gc-sections)
Looks badass? It is badass. Head over to my ArchiDroid 2.X project and see yourself how people react after switching to my ROM. Take a look at just one small example, or another one :). No bullsh*t guys, this is future.
However, please read my commit carefully before you decide to cherry-pick it. You must understand that Google's flags weren't touched since 7 years and nobody can assure you that they will work properly for your ROM and your device. You may experiment with them a bit to find out if they're not causing conflicts or other issues.
I can assure you that my OmniROM build compiles fine with some fixes mentioned in the commit itself. Just don't forget to clean ccache (rm -rf /home/youruser/.ccache or rm -rf /root/.ccache) and make clean/clobber.
You can use, modify and share my commit anyway you want, just please keep proper credits in changelogs and in the repo itself. If you feel generous, you may also buy me a coke for massive amount of hours put into those experiments.
Now go ahead and show your users how things should be done :cool:.
Hi i have tested a lot of OTA apps and configs and they are very annoying until i stop thinking for a moment and I find a solution for having true OTAS updates and not depending from other users just like Nexus Devices OTAS.
Ok we started:
First of all we need to download Android Bundle with contains SDK and Eclipse
Here it is: http://developer.android.com/sdk/ind...hl=sk#download
After it is download and installed.
You are going to download my fixed source for supporting from Android 4.1.2 to 4.4.2. https://github.com/werty100/OpenDelta
And Click on:
Them open Eclipse...
Go to file/Import:
Next and locate were is the download source
Then Finish...
Wait until it is import....
Go to res folder, values and open config.xml:
Here are the important values for making work your OTA in your phone.
Code:
 <!-- Property to read for ROM version -->

    <string name="property_version">ro.delta.version</string>


    <!-- Property to read for device identifier -->

    <string name="property_device">ro.delta.device</string>
This should be put in build.prop:
Ex:
ro.delta.version=1.0.2
ro.delta.device=i9000
You can modificated all values but you should modificate this ones:
Code:
 <!-- URL base to find .delta files, %s is expanded to property_device value. Path is suffixed by (expanded) filename_base -->

    <string name="url_base_delta">https://delta.omnirom.org/nightlies/%s/</string>


    <!-- URL base to find .update and .sign files, %s is expanded to property_device value. Path is suffixed by (expanded) filename_base -->

    <string name="url_base_update">http://delta.omnirom.org/nightlies/%s/</string>


    <!-- URL base to find the full zip files, %s is expanded to property_device value. Path is suffixed by (expanded) filename_base -->

    <string name="url_base_full">http://dl.omnirom.org/%s/</string>
Indicates where to find the ZIP for your phone...
Also you can modificate all UI and values....
After the essentials modifications you will need to compile APK:
Go here and click on selected item..
You will need to create your own KeyStores
Rellenate also this: https://dl.dropboxusercontent.com/u/.../rellenate.png
Them just put destination and click finish:
See Post #2 for Installation/Requirements/Download.
Now before getting into my new tool, I'd like to explain why I felt the need to even bother making it.
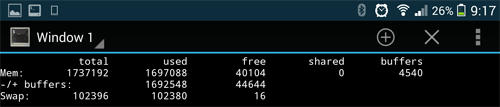
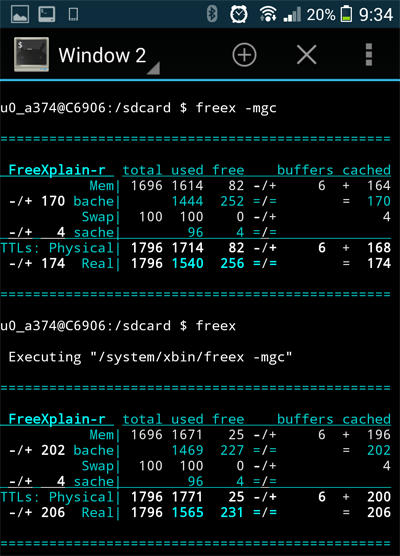
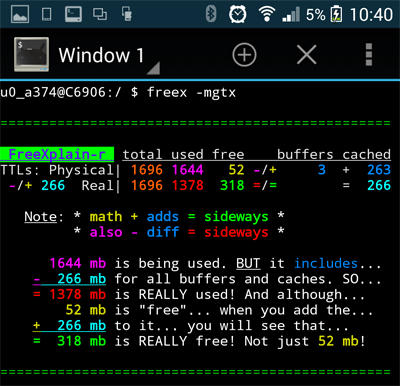
First of all, if you've ever typed "free" in terminal, you'd see that it shows almost no free ram while any app you check with would show lots of free ram.
This what it looks like.
Now if you're like me, you'd probably do a google search to figure out what the hell it means lol
Because I had over 200 mb "free" when I took that screen shot but that shows only 40mb free and it would be nice if it actually made some sense ;)
Some of you familiar with my V6 SuperCharger may have read this post of mine before: "Why 'Free RAM' Is NOT Wasted RAM!"
In there, I post some findings from my first hand experience and how it correlates with this article Linux Memory Consumption (which I had found afterwards)
Unfortunately, that page is now down but I had a saved copy in PDF format which I've attached.
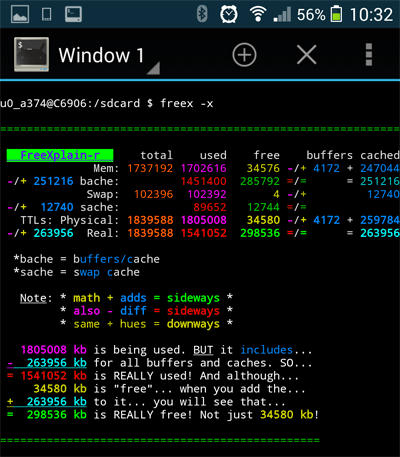
In that pdf, it reads "The absolute free memory number is not only the value of MemFree, but the sum of the MemFree, Buffers and Cached fields."
The "buffers" column shows the amount of memory being used by the kernel buffer cache. The buffer cache is used to speed up disk operations, by allowing disk reads and writes to be serviced directly from memory. The buffer cache size will increase or decrease as memory usage on the system changes; this memory is reclaimed if it is needed by applications.
The "cache" column indicates how many memory pages the kernel has cached for faster access later. Since the memory used for buffers and cache can easily be reclaimed for use by applications, the second line (-/+ buffers/cache) provides an indication of the memory actually used by applications (the "used" column) or available to applications (the "free" column). The sum of the memory used by buffers and cache reported in the first line is subtracted from the total used memory and added to the total free memory to give the two figures on the second line.
Swap space is generally used as a last resort when the system can't reclaim physical memory in other ways.
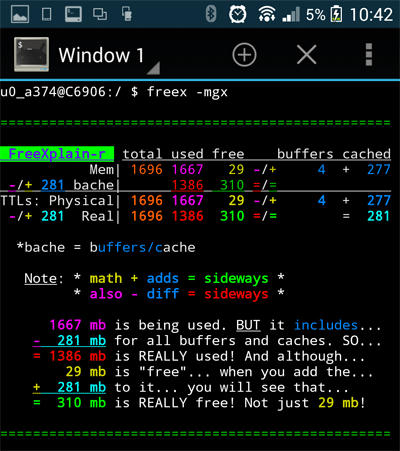
869 mb is readily available and not just 13 mb!
So if you read that page, you'd know that 855 mb is NOT actually wasted, it's being used by linux to speed things up!
Basically, if you're not using the ram for apps, linux is using it for cache instead.
And when you need that ram for apps, you get to reclaim it instantly ;)
Ok that's all nice nice but why did I bother making a new tool?
Well, if you look at the first screen shot up top, you'll see that the android/busybox free command does NOT have the cached column.
Therefore, the free command on Android actually tells us a little something...
...but whole lotta nothing!
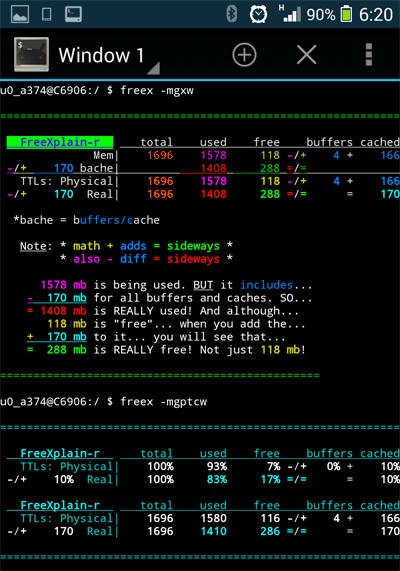
So, this is what I did about it...
Basically, I:
Added the cached colum
Removed the useless shared column (which is always 0 and is a waste of real estate)
Added the swap -/+ adjustment line (notice that 4076 kB is actually available, not just 16 kB)
Then total everything up nice nice ;)
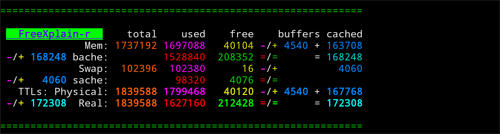
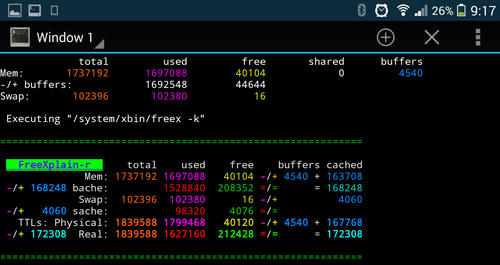
So here's a direct comparison of the 2 outputs:
I added colour to the free output for easy comparison.
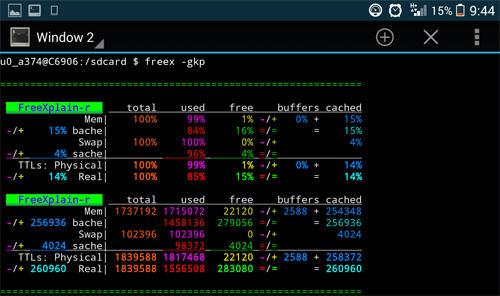
But notice how the -/+ adjustment line is COMPLETELY different.
The free command shows only 44,644 kB as being freely available but in reality, the value is 208,352 kB... not even close! Simply because free doesn't utilize the cached value (which is found /proc/meminfo along with all the other data.)
The math works both downwards... (add same colours to get the bold ie green plus green = green bold)
...and sideways ie. freely available(208352) = free(40104) + buffers(4540) + cached(163708)
Now, not everybody like rainbows so there is an alternate colour scheme...
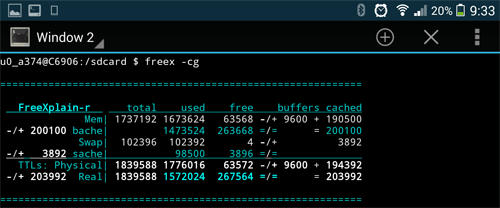
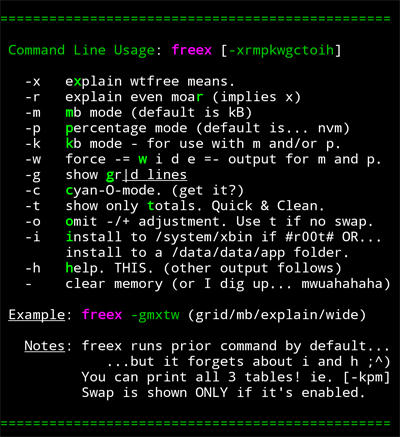
Of course, while I was at it (it took me nearly a month to perfect it), I added a whole bunch of options...
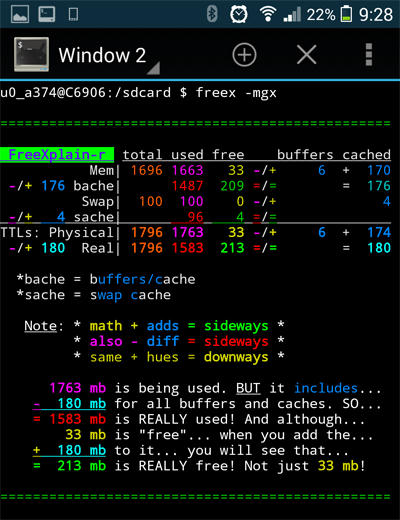
So let's see it actually explain something with the -x option...
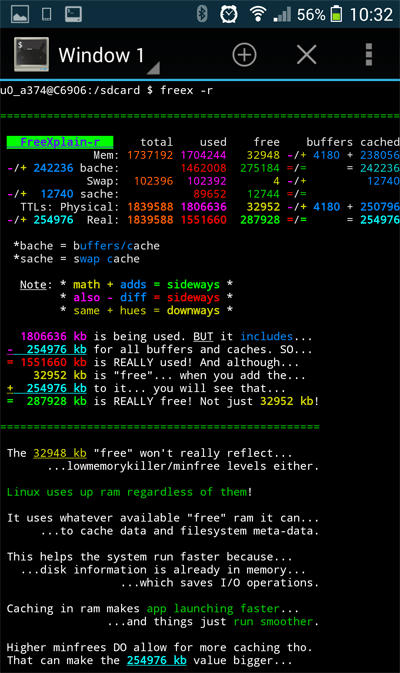
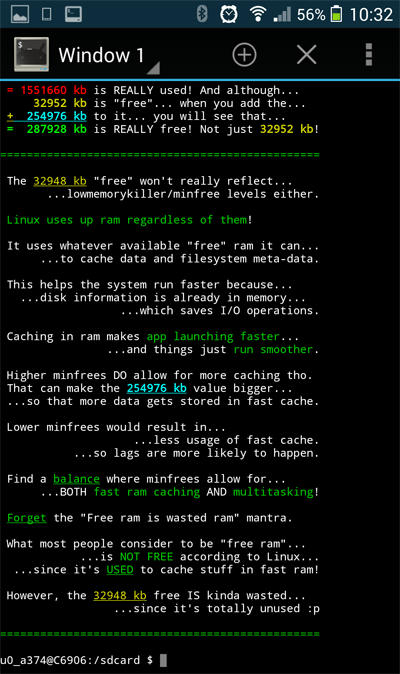
And explaing even more with -r... ( it's kinda like a mini tutorial ;) )
Since it has so many options, it would be a pita to remember all the options so that you can have your favourite output format all the time...
So it will actually remember your last command (but ignores -help and -install).
Just type "freex" and it automagically does what you did last time...
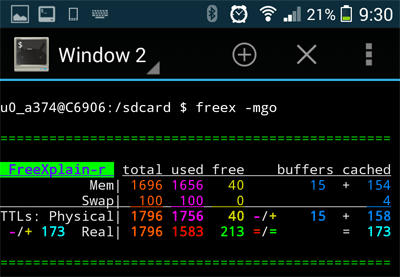
The output is different depending on whether swap is enabled...
I added the -o option from free which omits the -/+ adjustment line and added a -total only option...
Force -wide option when not using kilobytes (and using a smaller font)...
It's nice to see the percentage table along with kB and/or mb tables.
Also note that it automatically uses wide output when using kB.
Click the button for some gratuitous screen grabs...
Unbrick Xolo Q1000 Opus
Wipe Device and Flash Stock Rom
So finally here is the way to unbrick our Q1000 opus, and re-flash the stock rom. This will restore your phone to prestine condition ... just the way it was when you first got it in :cool::cool:
Steps this is a fairly simple process, i have put all the necessary stock image files into the zip, first we will flash the img files to our phone using DFU tools then we will use stock recovery to flash the update.zip containing Jellybean Stock Rom...Just follow the below steps :silly::silly: :):)
Step 1 extract the contents of DFU Tools.zip
Step 2 Open "DFU Tools" folder and run "install_drivers"
It will take a while to install , then you'll get the success message
Step 3 After Drivers are poperly installed, open dfu.exe
At first it will give you an error message shown below.. just click ok and proceed to next step
Step 4 Browse for the variant file contained in variant folder
Step 5 After loading variant you will see that the img files to be flashed are showing in the DFU tool window
Now go to the "DOWNLOAD" tab
Step 6 Below screen will show up ... when it does .. You need to connect Your phone to usb in power off state
Step 7 Phone will get detected and flashing will start ... after flashing is over phone will reboot, if it does not reboot then manually take out the battery and poweron the phone
Step 8 Now copy the "update.zip" file that you downloaded earlier to the root directory of your phone sd card then,
Go to Settings->About Phone -> Software Update
and select the update.
Thats it ... your phone will restart and flash the Stock JB rom and reboot once again ... and just like that Your XOLO Q1000 opus is Unbricked :):)
After trying to find an answer to this for months I decided to make a post. After converting my contacts from my old Windows Mobile Phone to a Note 3 I have exactly one contact with an issue. The issue is only in the text thread and is a problem when I try to send a text to the contact from the preexisting thread. The contact number at the top of the screen (below the name) has a letter in front of the number for some reason. The letter is not present if I go into the contact our if I export the address book to a spreadsheet through Gmail or Microsoft Live. I tried deleting the contact from Gmail and Live to see if it will start a new thread or fix the error, but it does not. The issue is not present when I create a new text to send to the contact so long as I am not doing it from the preexisting thread, but then everything ends up in the preexisting thread instead of a new thread.
Hopefully someone hear can walk me through a backdoor way of editing a text thread to fix this issue with the random letter in front of the contact's number so I can have regular text conversations with this contact without deleting the entire thread and message history.
This fix Requires ROOT and Busybox installed to /system/xbin
Context: I have been looking for a way to make an app that hides files to read/write files on my external SDcard, The way I found was to edit the platform.xml file to add that missing line as guided here: LINK this is just one of the many articles saying the same thing. which helped some apps work, but not the one i was looking for.
Reason: the point of this script is to make it so you do not have to set permission to the "media_rw" folder after every reboot manually.
Steps:
1) Follow and complete guide linked above, or any other similar guide, if you have not done so already.
*NOTE* some custom ROMs have already implemented this fix
2) After reboot use an app that allows you to make scripts (Ex. Rom Toolbox) this guide will use Rom Toolbox app
- create new script, name it whatever you want. I named it "sdcard permission"
- input this line and save:
Code:
chmod 777 /mnt/media_rw
*NOTE* you do not need to put it as 777 but it is what worked for me as it gave full read/write/execute permissions
3) Set script to run at boot
4) Run script manually then check app to see if it worked
-Alternatively go check /mnt/media_rw to see if it has the new permissions
Now you should be able to access the external SD card after every boot.
NOTE: you may need to redo the guide in the first step after switching ROMs as the new ROM may not have the fix implemented.
HELP! My Bluestacks 0.89 is rooted and i tried to use this app xxzhushou_android For Clash of clans (this app is auto search loot for the game clash of clan) ..Everything works fine but somehow, the float menu of the app is not shown. Some one said maybe the bluestack security blocks the float menu of the app,,,,,any1 thinks you can help me with this? it would be much appreciated ...
Necessary files and folders are installed automatically every launch if not found.
Place APKs to be modded inside "APK Files" folder.
All extracted or decompiled APKs are found in "Projects" folder.
Generated private keys are located in "OUTPUT" folder.
Zipped, signed, zipaligned and/or compiled projects are found in "OUTPUT" folder.
Quote:
Zipped/Compiled with Original Signature => system-%Project%
Zipped/Compiled with No Signature => unsigned-%Project%
Signed with Generated Private Keys => gpsigned-%Project%
Signed with Android Market => amsigned-%Project%
Signed with Test Keys => signed-%Project%
* Testers would be much appreciated to keep the tool stable.
** If possible, post full info regarding bugs encountered here.
*** Let's try to fix issues / errors ASAP. THANKS!!!
Tired Of using Cwm whether its automatically created with MtkDroid tool or its version 6.x.x.x on XOLO A600.
I had provided a new recovery i.e, Carlive Touch recovery by manually ported using the instructions provided by Master Shifu Carlive . And I come to know that everyone liked it,
But they also want the TWRP by Teamwin . As we know that XOLO A600 is not a worldwide famous device so we don't have much devs.
SO I manually compiled TWRP 2.3 for Our device.
PLESE DON'T FORGET TO GIVE PROPER CREDIT IF YOU ARE POSTING IT ANYWHERE. :)
Attempting to modify your bootloader may brick your phone/device!!
This is a program I wrote to find images in any type of file. I modified a run length encoder/decoder, rlimager.c, that strictly does the encoding/decoding. RUN_length_imager.bat is a windows batch script that takes a file and turns it into a viewable image. You have options to run length decode or encode, as well as specify different line lengths and pixel formats. I have proven these methods to work for different styles of bootloader graphics.
Rlimager.c is based off of the original to565.c put out by the AOSP several years ago. To565 was made to convert an rgb24 image into a rgb565 run length encoded file which could then be named initlogo.rle, and packed into the boot image for a kernel splash screen. Of course having the ability to encode images in this format left users the want to decode them as well (to make sure it worked before they flashed it to their device). XDA user @zebarbu in this thread, made a program to decode rgb565 rle as well. I must credit both of these authors, as rlimager.c is based off of both these programs.:good: I have added additional decoding/encoding of some newer formats; as mentioned below.
The executable rlimager.exe was compiled with mingw32-gcc 4.8.1 on a 64-bit Intel running Windows 7, and has been tested on Windows 7 Home Premium and Windows 8. The batch script, RUN_length_imager.bat, will not work with obsolete versions of Windows. Both sources are available in the second post. FFmpeg is also in the download, and the source can be found here, while the included pre-compiled version was downloaded at Zeranoe.
Googles ADB is also included in the download.
The download is at the bottom of this post; "RUN_length_imagerv1.0.rar", should be unzipped into a new directory.
To load a file into RUN_length_imager.bat, you have two options:
-Drag and drop the file you wish to use onto the "RUN_length_imager.bat" file.
-Run the program and choose option 4 at the menu. This will pull whichever partition you choose, from your device to your computer.
Note:
The second method requires you to have your ADB drivers for your device installed on your computer. You must also have busybox installed on your device. If for some reason ADB will not start and you end up with a blank partition list, simply close the program and open it back up and it should work. If it still doesn't work your ADB is probably not functioning correctly.
What is run length encoding?
RLE is a simple method of encoding an image. If you have 1000 pixels of the exact same color, you can save memory, by instead of encoding (R,G,B) 1000 times; you can add a count before the pixel description, 1000 (R,G,B). This works real efficiently for images that have lots of pixel runs, but an image where every pixel is different actually will take more memory than your conventional method of storage.
A couple of months ago I wanted to make a boot animation for my Nexus 7 2013, that utilized the Google splash screen in the first part of the bootanimation. I started searching Google and XDA and found that it was embedded in the bootloader somewhere, but nobody had a clue how to retrieve it. I could see the battery charging icons with a hex editor and use FFmpeg to convert them from their encoded rgb24 pixel format into usable images. That was easy, but I couldn't find what I was looking for. I then figured they were in some odd pixel format, maybe even proprietary. I made loops going through every conceivable pixel format at different widths, generating 1000's of images, still nothing. The last thing I tried was making an image where every bit in the bootloader was translated into a pixel, either on or off, still nothing. I pretty much gave up, until I happened across this thread. I had heard of run length encoding, but didn't know it was used in Android. I soon found that Google and some manufacturers were using it for the graphics in their bootloaders.
Hit the button below to see the splash screen for the Nexus 7 2013, this is an exact image, with the Google logo and Unlock Icon in their un-encoded form as seen on the devices screen. (unfortunately the splash screen wasn't encoded as a complete image, the text was encoded one place and the lock icon in another, so I did have to use photoshop to make a 1200x1920 black background and place the Google logo right in the middle, and I had to put the lock icon in the right position.)
The complete Google splash screen in full 1200x1920 can be downloaded as an attachment at the bottom of this post. It is a PSD with a black background layer and the 518 pixel "Google" and the 72 pixel "unlock" all on separate layers.
The Run Length Patterns:
I have found three different run length patterns so far. The first is the original one mentioned up above, rgb565, or as I call it 2 byte. This format can be used to encode any pixel format that uses two bytes per pixel. It works like this, the first 2 bytes is the count and the next 2 bytes is the color. The M8 uses this encoding for its bootloader graphics.
Note:
When I say "can be used to encode any pixel format that uses two bytes per pixel", I really mean pixel formats with sequential pixels. Some pixel formats use the YUV colorspace. Not all formats stored in the YUV colorspace store the pixels sequentially. For instance some YUV pixel formats will take 6 bytes of data for 4 pixels, but the first 3 bytes are not just for the first 2 pixels.
In the RGB colorspace there are BAYER pixel formats which don't encode sequential pixels either, the colors are split onto different lines in this method. Neither of the previous examples are candidates for this type of run length encoding.
The Nexus 5 and 4 use this next one, what I call 3 byte, because it can be used to encode any pixel format that uses...3 bytes per pixel. This encoding uses a 1 byte count and 3 byte color. This is easily the slowest method, for obvious reasons.
The last one, up to this point, is what I will reference as 4 byte. It works with four byte per pixel pixel formats, and uses 4 bytes for the count and 4 bytes for color. Both Nexus 7's use this format.
There may be more patterns, but it is hard to find partition dumps to download off the internet. I have found several though, and found run length encoded images in almost all of them. If anyone wants to upload a bootloader, I will gratefully add it to my collection and see what is in it.
This program will take any file, and decode it using whatever pixel format you choose, and if you have run length decoding turned on it will automatically associate the proper run length method to make a usable image, if there is one. Another important thing when dealing with raw image files, besides the pixel format, is the line length (width). This width is encoded in regular image files like bmp, jpg, and pngs. But raw images are nothing but pixel data. To get the correct image, if there is one, you have to specify when to go to the next line. I have built loops into the windows script that will let you specify multiple pixel formats to run, with an embedded loop that goes through all of the different widths you choose.
You may want to load a whole bootloader file to see if there are any images in it. To do so just drag and drop the file onto "RUN_length_imager.bat" Since the file contains different types of code and possibly images, you will want to set the maximum pixel count down to around 1000. This will limit the maximum number of a pixel run. This is necessary because not all of the data going through the decoder is meant to be run length decoded obviously, so FF FF FF FF 01 01 0A F0 in a 4 byte rle scheme will decode to over 16 gigabytes if you don't have your maximum pixel run set down to halt this.
Note:
You can stop the program at any time. I designed the program to save your settings before running and after changing anything. So if you accidentally don't set your max run and it seems like it is taking forever, and you are watching the output file size growing and growing, you can simply x out of it, or close it. Restart it and adjust whatever you have to.
Another variable is the byte offset. Since the very first count byte has to go into the decoder as the very first count byte, you may have to offset the whole file up to a certain number of bytes as specified below.
For 4 byte rle patterns offsets to be tried are 0,1,2,3,4,5,6,7.
For 3 byte rle patterns offsets to be tried are 0,1,2,3
For 2 byte rle patterns offsets to be tried are 0,1,2,3
The last variable is the width. Hitting 2 in the program will allow you to set a range, or specific widths. Example: My Nexus 7 2013 bootloader has the Google logo as a 518 pixel wide image, the android as 712, the buttons as 1090, and some other things at 600 and 960. I would enter:
Code:
518 712 1090 600 960
You simply separate the different widths with spaces. You can't mess up, you can put whatever width (in any order) you want to in and it will make an image.
The second method is an exploratory method, where you enter the starting width, skips, ending width. All separated by commas.
Example:
Code:
712, 1, 1200
This will run through every width, incrementing by 1, from 712 pixels to 1200 pixels.
Note:
The height is automatically calculated based on the width, filesize, bytes per pixel. This happens at the core of the loops.
Click the button below to see what the entire Nexus 5 bootloader screen looks like when the bootloader "file" is loaded with these settings used: pixel format rgb24, max run 1080, offset 0, line length 1080. The image is really big, because the whole file is run length decoded.
This is the Nexus 4, whole bootloader, pixel format rgb24, max run 1080, offset 0, line length 720
You've Identified there are images, but how do you extract just the images?
You need a good hex editor, don't worry though because you don't have to look at any hex. I prefer 010 Editor by SweetScape Software. You get a free 30 day trial. Download it. Load your bootloader file into it by right clicking on the file and selecting "010 editor". If you don't have your bootloader file you can use option 4 in RUN_length_imager.bat and pull the partition from your device. If you don't know what partition you are looking for or how to do it manually, here is an excellent guide. If you use my script, the partition will be saved in the "__partitions__" folder.
Go up to View:
Set Left Area to Char
Set Right Area to Binary
Change Line Width to Custom Width
Choose a value where the characters on your left pane almost fill up your screen so that when you start scrolling over, your right pane (binary) is right there. The right binary pane is a lot wider, that's why I prefer it on the right. Also choose a width that is evenly divisible by 8, I set mine at 224, using a small 1366x768 laptop.
A real handy shortcut in 010 editor is Ctrl + and Ctrl - to enlarge or shrink the font.
The 4 byte run length encoding is the easiest to identify because there is 4 bytes for the count, and the biggest number you can store into a 4 byte address is over 4 billion. The 3rd and 4th bytes are usually nothing but zeros. The only 4 byte pixel format I've seen used so far is, bgr0, which also has the fourth byte as nothing but 8 zeros. Here is what a typical looking 4 byte rle image looks like.
Notice how the count value, mostly, show up as just four periods ....
Sometimes the first byte (period) will be a different character representing a higher value for a run of same colored pixels. Also notice that there is a lot of black and white (gray) shades in the color values. All colors on a grey scale, represented in rgb, are equal values. A value of 255,255,255 is white 200,200,200 is a light shade of grey, and 0,0,0 is black. The rgb values will always be identical to be an exact shade of grey. This image is part of the Google logo which is mostly black and white.
Any area that you highlight in the "char" pane will also be highlighted in the "binary" pane when you scroll over, you'll find this extremely handy. These 8 bytes is one complete encoded run, which represents 15 pixels pure white. You can see exactly how the four count bytes sit beside the bgr0 color bytes. Byte 1 is 00001111, binarys equivalent to decimal 15. Bytes 2, 3, and 4 are 0; then the color bytes 5, 6, 7, 8. Blue is represented with the 5th byte, green the 6th, red the 7th, and the 8th byte is not used in this pixel format. Don't get confused about the pixel format, because this method of encoding will cover all 4 byte per pixel formats, some could use the 4th color byte (or alpha), and the order they're in is not that important right now. Unless you know exactly what you are looking for, like the infamous green android laying on its back, you may be trying to pay more attention to the green column when trying to find where the image starts or stops.
(This is the binary copy of the android image you see if you have a Nexus 7 2013)
(from Nexus 7 2013 bootloader)
This part can be kind of tricky, I actually surprised myself at how good I was at "getting lucky" and finding the correct beginning and ending of an image in the bootloader files. So that probably means that it really isn't that hard, it is just not something you encounter every day. Being aware of how your image should be encoded helps a lot. If you know there are 100's of black pixels at the start and/or end of an image, keep that in your mind when looking at the characters.
An image will never start or end with the count byte(s) as 00000000!!! But, often times they DO start or end after some zeros, or before some zeros at the end. Take for example: This is the beginning of one of the lock images. (notice how it is right after the text ANDROID BOOT, hmm)
(Keep in mind that this is a 4 byte pattern run length encoding, which actually will consume 8 bytes total per run. Four bytes for the count and four bytes for the color. The other two patterns look as you would think: 3 byte .### 2 byte ..##)
Notice how the count bytes before what I have highlighted in blue is all zeros. So you won't start there, move right and see what that is. And that is your image start, it is a run of 28 solid black pixels (0,0,0,0) Once you have identified the start, and hopefully selected it as I have in the screenshot, write down the number after "Start:" Which is 3097596.
This is the end of the lock. Notice the characters all of the sudden changing, this is an indication of a color change. I visually scanned line by line and found this spot that separated all the ÿÿÿ and ÀÀÀ's up above to the newer assortment of characters like ## and 33Ì
Now you need to isolate just that image. With those last 8 bytes selected, go up to Edit - Select Range, and down at the bottom of the screen, enter in the start byte you wrote down earlier. Hit enter and the encoded image will be selected. Copy this by hitting Ctrl-C or going up to Edit - Copy.
Go to File - New - New Hex File
Hit Ctrl-V to paste, or go to Edit - Paste
Now save that file somewhere, and drag and drop it onto "RUN_length_imager.bat"
I already knew the width of the image before writing this, but here is the output with the Line length set at 60,1,80 and pixel format bgr0
Notes:
This guide is a work in progress, I will update it soon, then as needed.
You can also encode jpg, bmp, and png files into whatever 2, 3 or 4 byte pixel format you choose. The run length encoding will be automatically adjusted according to which pixel format you choose. When encoding images into the pixel format rgb0, bgr0, 0rgb ...
Any of those 4 byte formats. FFmpeg will put 11111111 in place of the zero in the zero byte position. I'm not sure why it doesn't put 00000000 like it should, but I know how to fix it, but it involves another option, and I haven't gotten to it yet. If you were to try writing this to your device, I have no idea how Android would treat this 11111111 in the null spot, because as far as I know rgb0 (and cousins) is a made up definition by the writers of FFmpeg to describe rgb24 as rgb32 with 8 bits per color, and 8 padding bits.
Nexus 5 & 4 use the pixel format rgb24. The whole bootloader screen is encoded in one pass, as opposed to drawing several images at different spots on the screen.
The Nexus 7 1 & 2 use the pixel format bgr0. It's kind of ironic that at first when I was looking for the Google logo, I thought it was entirely made up of black and white pixels and stored in an 1 = white 0 = black, binary format (that would account for no one being able to find it, unless you do like I did and use the monow or monob pixel format in FFmpeg), but in actuality the format that it is stored in can potentially contain billions of colors. (4 byte color)
The Nexus 7 2013 Unlock Icon has a white pixel at the bottom right that you can clearly see on the device and from the image. Does it mean something, or is it just poor editing by the people at Google?
The Nexus 7 2013 has the Google logo encoded in 3 different places in the Bootloader. They are binary copies of each other, so that leads me to believe that the reason for this is to discourage people from trying to edit the images. Maybe you'd brick if you just changed one and not all three? I don't know, but can't think of any other reason why they would do this. There is also two unlock icons, not counting the big one on the bootloader screen that asks you if you're sure you want to unlock it.
The Nexus 7 2013 has the only bootloader, that I've encountered, that not only stores images in a 4 byte run length manner, but there are also non-encoded 3 byte rgb24 images for the battery icon, and charging icons. Even the older Nexus 7 has all of the images run length encoded.
Not much was in the Samsung bootloaders, I did find the Linux penguin, non-encoded in the Note 3. But I did find the "font mask" that uses bits to make some different fonts stored as bit masks. You can see it, using the monow or monob pixel format and setting your width at 16 32.
The HTC M8 uses the pixel format rgb565. The only device I own is the second generation Nexus 7, and it is the only one where I have been through the bootloader with a purpose. Since I don't own a M8 I really kind of just glanced at it in the hex editor and found the exclamation triangle, the htc silver logo, and the android laying on its back. It also has the bit mask font embedded in it for the text, as I mentioned about the Note 3.
I take absolutely no responsibility to any damage that is done to your device or computer with any of these programs.Download RUN_length_imager v1.0
The source files can be found in the following post!
Some more images:
Nexus 5
HTC M8
Logo minus the reflection, at first I didn't know there was one, will add full image later.
2013 Nexus 7 where you can see all three logos
Dash Mod Is Designed To kill lag for all devices There is 2 Relases:
-Latest Dash M Rc1 is a great script kills your lag /set your phone free based on free xplain by zeepilinrox
that it tries to block the work of task managers as most of u known that used ram is more fast/usefull than free ram
-Dash Stock Final: No Init.d support required : Increasing preformance by build.prop tweeks
note :That will remove other tweeks RC1 Change Log:
Code:
-Added Tweeks to apply every boot (For Faster Preformance )

-BASED On FreeX (Tries To block the work of task killers Thats and advantage not dissadvatage ; u should try )

-Optimizes Storage to non-rotated

-io stats to reduce overhead

-optimizations for read ahead

-Decrease alot boot time

-Optimize Apps Database Daily

-sd read ahead 2048

-added mainfree tweeks for maximum multitasking

-network speed and throughput tweeks

-vm tweeks

-MEMORY SETTINGS for general operation + zcache/zram usage

-renice processes at wake.

-adding zram swap in RAM

-Battery Calibration Tweeks

-Battery Saving Tweeks

-Moves DalvikCache To >Cache If Ur Cache is enough (fixes most of cache proplems)

-improve handling & reactivity of the CFS cpu scheduler

-Kills Almost Whole Lag

-zipallign data and syatem every 24 hr

-Background process to optimize dialer process

-fixes black screen after a call

-renicing kswapd (useful on non-swap phones)

-Added DasH Engine

-Added Entropy/rngd Support
Triminal Codes Entropy( more effective dash) Codes: Activate
I am wanting to know where the display driver is located on an Android device, and in which partition?
I want to transplant the display driver from one device into an image file for flashing to another device.
edit: just answered my own question, it's lk.bin - or uboot, just ripped that section off and transplanted it on a rom that works on the other device but wrong display driver.
While I'm here, does anyone know what corresponds to the screen digitizer? I know it's in the system image file rather than in the boot, as there's a difference with the different system images from different devices, but same boot and kernel from same device.